Google Voice is a handy tool that helps healthcare providers talk to patients safely and in a cost-effective manner.
If you’re a medical practitioner, a small clinic, or a hospital, Google Voice can help you talk to your patients while providing a layer of privacy.
It’s super important for medical personnel and hospitals to keep patient information safe and private. They should never take shortcuts on this!
In this guide, we’ll show you how to set up Google Voice for healthcare. This way, you can keep everything safe and make sure your patients’ information stays private.
Why Should Healthcare Providers Use Google Voice?
Healthcare providers should establish a smooth and secure way of communication. They need to send safe texts, make end-to-end encrypted voice calls, and send protected health information. Therefore, to keep things safe and follow the HIPAA telecommunication rules, healthcare businesses need a good telephone service. Google Voice is a great choice for this. This is because it’s affordable and versatile.
Here is how Google Voice is beneficial for healthcare providers:
- Google Voice lets you keep your number private while communicating with patients.
- It offers free and paid plans, making it an economical solution for private practice owners and small clinics.
- Google Voice enables call forwarding, ensuring you never miss an important call from your patients.
- You can use Google Voice on any device, like your phone, computer, or tablet, so you can talk to patients anytime, anywhere!
- Google Voice lets you send and receive texts, so it’s a great way to stay in touch all in one place!
How to Set Up Google Voice as a Healthcare Provider?
Getting started with Google Voice and making sure you and your patients are safe requires that you know how to set up your account so that you can use features like voice calls and messaging securely.
Let’s find out how you can do that!
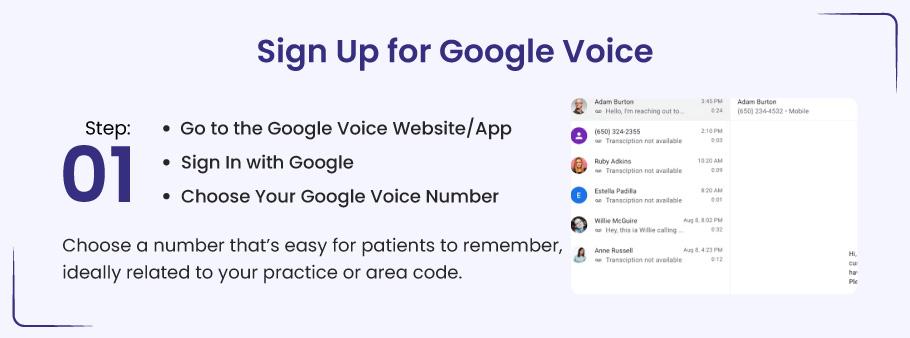
Step 1: Setting up Google Voice on Various Platforms
When you set up a Google Voice Account, you may have one of three platforms. You may start with an iPhone with an iOS or Android device or set it up on your PC with Windows, any browser, etc.
First of all, see how will you get started on all these:
🔴 Google Voice on iOS
On your iPhone, follow these steps:
- Go to the App Store on your iOS device and search for “Google Voice.”
- Download and install the app.
- Launch the Google Voice app from your home screen once it’s installed.
- Enter your Google account credentials to sign in. If you don’t have a Google account, you’ll need to create one.
- After signing in, you will be prompted to review Google’s Terms of Service and Privacy Policy.
- Tap Accept to continue.
- Tap Search to begin looking for a number.
- You can search by city or area code. If there are no available numbers, try using a nearby city or area code.
- Once you find a number you like, tap Select.
- Follow the on-screen instructions to finalize your setup. This may involve verifying your phone number and completing additional security steps.
- After setup, you can link another phone number to your Google Voice account to forward calls if needed.
🟢 Google Voice on Android
In the case of an Android device, follow these steps to get started
- Go to the Google Play Store on your Android device.
- Search for “Google Voice” and install the app.
- Once the app is installed, open it from your app drawer or home screen.
- Sign in using your Google credentials. If you don’t have an account, create one.
- You’ll be asked to review Google’s Terms of Service and Privacy Policy. Tap Continue to accept.
- Tap Search to find a phone number.
- You can search by city or area code. If a number isn’t available in your area, try a nearby location.
- Once you’ve found a number you want, tap Select.
- Follow the instructions on the screen to finalize the setup process, including linking your existing phone number to Google Voice.
🟣 Google Voice on Windows
On your PCs running on Windows, you can set up your Google Voice by following these steps:
- Check System Requirements. Ensure that your device is running Windows, macOS, or Chrome OS. Google Voice also supports several web browsers, including: Google Chrome, Mozilla Firefox, Microsoft Edge, and Safari.
- Open your web browser and go to voice.google.com.
- Log in using your Google credentials. You’ll need to create an account if you don’t have one.
- You will be asked to review and accept the Terms of Service and Privacy Policy. Click Continue to proceed.
- You can search for a Google Voice number by entering a city or area code.
- If a number isn’t available in your area, consider trying a nearby city or area code.
- Once you find a number you like, click Select next to it to claim the number.
- Follow the on-screen instructions to finalize your account setup. This includes verifying your phone number and setting up any necessary preferences.
✨ How to set up a Google Voice shortcut in Windows?
If the Google Voice app doesn’t appear in your Google Apps list in Chrome, follow these steps to add a shortcut to your App Launcher for easier access:
- Go to voice.google.com
- Open your browser and visit voice.google.com.
- Open your browser and visit voice.google.com.
- Click on the Google Apps Icon
- Click the Google Apps icon (the 9-dot grid) in the top right corner.
- Click the Google Apps icon (the 9-dot grid) in the top right corner.
- Add Google Voice to the App Launcher
- Under voice, click on Add a shortcut.
- This will create a shortcut for Google Voice in your Google Apps section, making it easily accessible.
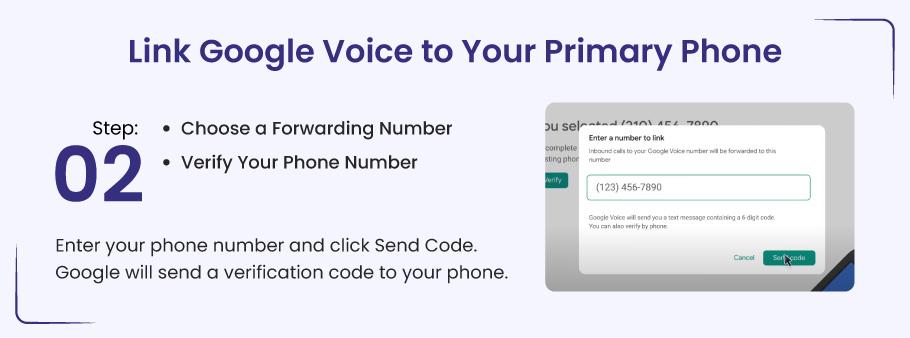
Step 2: Link Google Voice to Your Primary Phone
Google Voice allows you to link your personal or business phone number to your Google Voice account, so you never miss an essential patient call.
After selecting your Google Voice number, you’ll be prompted to link it to a forwarding number (your personal or business phone). This means calls to your Google Voice number will be forwarded to your primary phone.
- Enter your phone number and click [Send Code]. Google will send a verification code to your phone.
- Check your phone for the code that Google sent. Enter that [Code] into the Google Voice setup page and click [Verify] to complete the linking process.
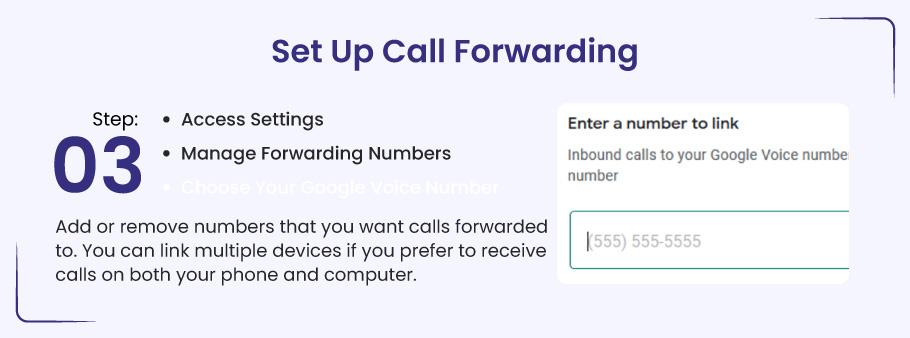
Step 3: Set Up Call Forwarding
Call forwarding ensures you can receive calls from your Google Voice number on any of your preferred devices (phone, tablet, or computer).
- Click on the three vertical dots in the upper-right corner of your Google Voice page or app to open the menu. Select Settings from the dropdown list.
- Under the Account tab, scroll to find the Linked Numbers section. Here, you can add multiple phone numbers to which you want calls to be forwarded.
If you have a team or use multiple devices, you can link several numbers to ensure you never miss a call at the office or remotely.
*Note: For healthcare providers, this feature is beneficial for ensuring you’re available during business hours and flexibility for after-hours or emergency calls.
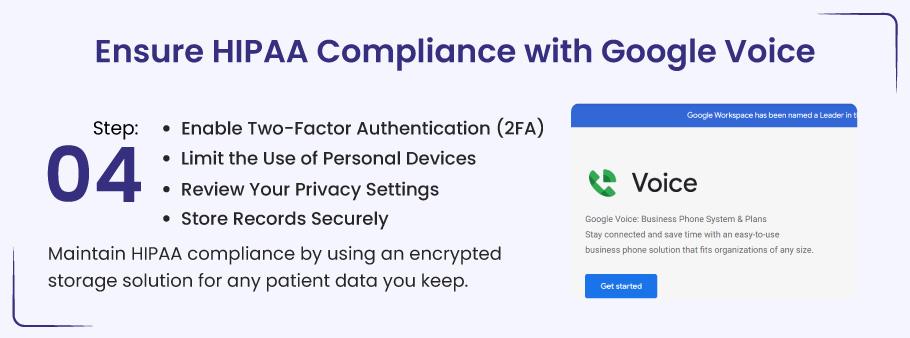
Step 4: Ensure HIPAA Compliance with Google Voice
Though Google Voice offers secure communications, it’s essential to take additional steps to ensure compliance with HIPAA (Health Insurance Portability and Accountability Act) for the privacy and security of patient information.
To enhance the Security of your Google Voice account, enable 2FA (Two-Factor Authentication) on your Google account.
- Go to your Google Account settings and select [Security].
- In the 2-Step Verification section, click [Get Started] and follow the prompts to set it up (usually requiring your phone number for text or app-based verification).
Using personal devices for patient communication can compromise privacy. Consider setting up a dedicated phone or device exclusively for your Google Voice communications with patients for greater confidentiality.
- Go to your Google Voice Settings and review all privacy-related settings.
You can adjust who can call or message you and block spam or unwanted numbers. This ensures that patient communication remains private and secure.
While Google Voice is not fully HIPAA-compliant, you can ensure your practice stays compliant by securely storing calls, texts, and voicemail records. Use encrypted cloud storage solutions for any patient data you store outside Google Voice.
Step 5: Set Up Voicemail for Your Google Voice Number
Google Voice allows you to personalize your voicemail message, which is critical for maintaining a professional tone and informing patients when they expect to hear back.
For this, consider personalizing your voicemail.
- Open the Google Voice app or website and go to Settings.
- Scroll down to the Voicemail section and click Record a Greeting.
- Follow the prompts to record your message.
*Note: Include an informative message telling patients when they can expect a return call or the following steps, especially if you’re unavailable or out of the office.
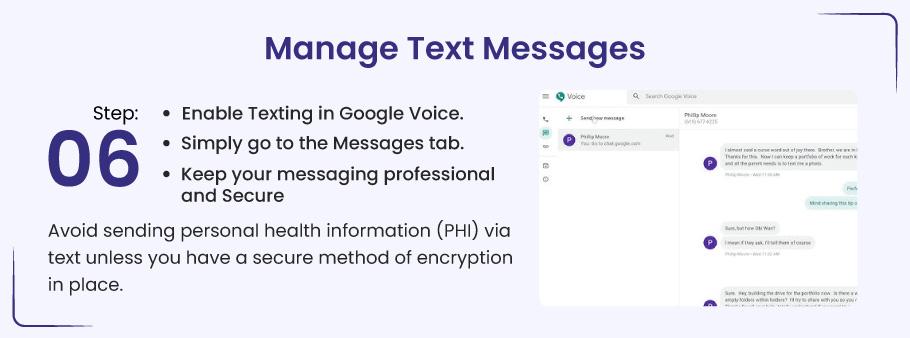
Step 6: Manage Text Messages
Google Voice texting is a great, discreet way to stay in touch with your clinic’s patients. But it’s really important to stick to the rules about privacy and being professional.
Here’s how to turn on texting in Google Voice:
- Open the Messages tab in your Google Voice app or on the website to send and receive text messages using Google Voice.
You can send texts to patients to remind them about appointments, confirm their visits, or answer any questions they have.
Always be professional when you send messages, and don’t share personal health info through text unless it’s safe to do so.
To follow HIPAA rules, make sure to send important patient information using safe, encrypted apps instead of regular text messages.
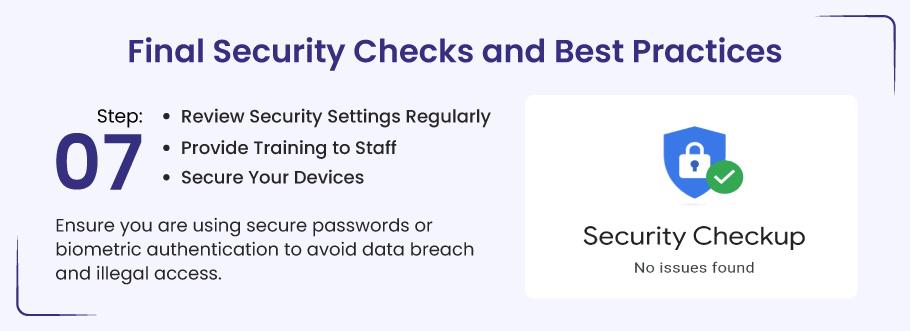
Step 7: Final Security Checks and Best Practices
Ensuring your Google Voice setup is secure and HIPAA-compliant is an ongoing process. Follow these best practices to keep your communication system safe:
- Regularly review your Google Voice security settings to ensure no unauthorized access.
- Enable alert notifications for unusual activities, such as unexpected calls or messages from unknown numbers.
Make sure everyone on your team knows why HIPAA rules are important, how to keep things private, and the right way to use Google Voice. First off, this means not sharing patient information without permission and knowing the rules about using text messages for medical services discourse.
Next up, if you’re using a phone, tablet, or computer to use Google Voice, make sure they have a password and can use your fingerprint or face to unlock them.
Finally, to keep patient information safe, think about using secure messaging apps when sharing details online. This way, things stay private and help prevent problems.
Pro Tips for Healthcare Providers
➜ Make your voicemail greeting special by adding important info for patients. You can tell them your office hours, what to do in an emergency, or remind them to leave a message.
➜ Google Voice lets you turn voicemails into text, so you can read them right in your inbox. This is super helpful for looking at patient messages fast!
➜ Block unwanted or spam calls using the block feature! This helps you stay connected for important talks with patients.
➜ Turn on call screening to check calls before you pick up. You can see who’s calling so you can figure out if it’s important or if your team can take care of it.
➜ You can connect your Google Voice number to other phone numbers, like your home or work phone, to handle calls better. This helps you never miss important calls! When someone calls, it can ring on different devices at the same time, so you can pick the one that’s easiest for you to answer.
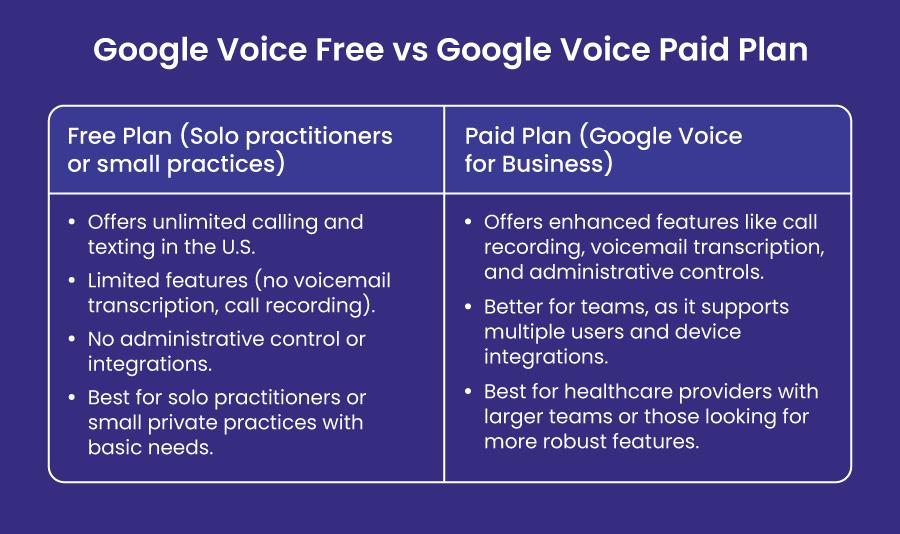
Google Voice Free vs Paid Plan: Which Is Better for Providers?
Now, when deciding which plan a healthcare provider should choose, they must have their needs in mind. Choose a suitable plan according to your practice size. There are two plans available for Google Voice, including:
- Free Plan
- Paid Plan
Google Voice Free Plan
The Free Plan from Google Voice is really cool because it doesn’t cost anything! It does a great job with the basics, but you should think about its limits, especially if you’re a healthcare worker handling patient calls and information.
Let’s talk about what you get with a Google Voice free plan and what you don’t get:
✅️ Unlimited Calling and Texting in the U.S.
This is a great bonus! You can call and text any number in the U.S. without extra charges. This is really helpful for solo practitioners or small practices. When you’re a therapist or independent doctor with a small group of patients, this plan will meet your contact needs.
❌ No Voicemail Transcription
One downside? No voicemail transcription. If you get the paid plan, Google Voice will turn your voicemails into text. This way, you can easily read the messages and see if you need to call back right away. If you don’t have this feature, you’ll need to listen to each voicemail one by one. That can take a lot of time, especially if you get many calls from patients or questions.
❌ No Call Recording
You can’t record calls if you’re using the free plan. Healthcare providers can find it useful to record calls. It helps them keep track of important information, especially during telehealth visits, and can also be great for training their staff. If you don’t have this feature, you’ll need to use notes or write things down yourself, which can be a hassle and not very safe.
❌ No Administrative Controls or Integrations
The free version doesn’t let you manage settings or connect with other systems. That means you can’t assign phone numbers to different team members, monitor call usage, or tie the phone system into other tools you might be using (like patient management software). If you only have one patient or a small office, this might not be a big deal, but it can become a problem as your business grows.
Google Voice Paid Plan
The Paid Plan is suitable for hospitals and larger practices. It’s more expensive, but it has enhanced functionality to benefit healthcare providers, especially if you’re managing a team or need more control over your communications.
Here’s what you get with a paid plan:
✅️ Enhanced Features Like Call Recording
This feature alone is a game-changer for healthcare providers. Being able to record calls can be helpful for:
- Documentation: You might want to refer back to a conversation with a patient, especially if it involves critical health information or detailed instructions.
- Telehealth: If you’re conducting virtual consultations, recording the call provides a reference point and protects you legally.
- Training: If you have a team, you can use recorded calls for training purposes—helping new staff members understand best practices when interacting with patients.
✅️ Voicemail Transcription
Voicemail transcription is one of the standout features of the Paid Plan. It transcribes voicemail messages to text, so you can easily read them instead of listening to the entire recording.
This can save time, especially when managing a busy practice with many patient inquiries.
It’s also handy if you’re juggling multiple tasks and want to check important messages quickly.
✅️ Administrative Controls
As your practice grows, managing communication becomes more complicated.
The Paid Plan gives you administrative control, which means you can assign numbers to different team members, manage call logs, and have more visibility into the communication happening across your practice.
For larger teams, this is vital for maintaining smooth operations.
✅️ Multiple Users and Device Integrations
The Paid Plan is designed for large practices.
The Paid Plan lets you assign different phone numbers or call forwarding options to each if you have multiple staff members like receptionists, office managers, or other therapists.
This allows you to keep your communication organized and streamlined.
Also, it integrates with other Google tools like Google Workspace, which can be a massive time-saver if you already use Google’s suite of productivity apps.
✅️ Better Customer Support
With the Paid Plan, you’ll get access to premium support. This can be helpful if you run into any issues or need assistance setting up your system, especially as your practice grows and your communication needs become more complex.
Which Plan Should You Choose for Your Practice?
Let’s talk about which plan is the best fit for you and your needs!
If you’re a solo practitioner, the Free Plan should be just right for you. You get unlimited calling and texting, and you can keep your number separate from your professional one.
If you need more features later, you can always switch to the Paid Plan!
Imagine you are in charge of a hospital or a big medical office, have lots of patients, or offer online health services. In that case, the Paid Plan gives you tools to talk better, track how you connect with patients, and keep everything secure and professional. Adding features like voicemail transcription, call recording, and administrative controls can take your practice to the next level.
Conclusion
Using Google Voice for healthcare can help doctors keep things private, communicate more effectively with patients, and save money.
But it’s really important to follow the right steps to keep communication safe and follow HIPAA rules.
By following this guide, healthcare providers can set up Google Voice in a way that supports their practice while maintaining the confidentiality and professionalism required in the healthcare industry.
If you need more help or have questions, reach out to Google Voice support or read this HIPAA-compliance voicemail checklist to make sure your practice follows all the rules and does the right thing.
