There are strict rules, deadlines, and no room for error for Medicare DME billing. This guide will show DME clinics and suppliers how to check eligibility, obtain documentation, choose correct HCPCS codes and modifiers, submit clean claims, complete prior authorization, and resolve denied claims. Every step of the process is clearly defined and actionable so that your team can minimize mistakes and expedite payments.
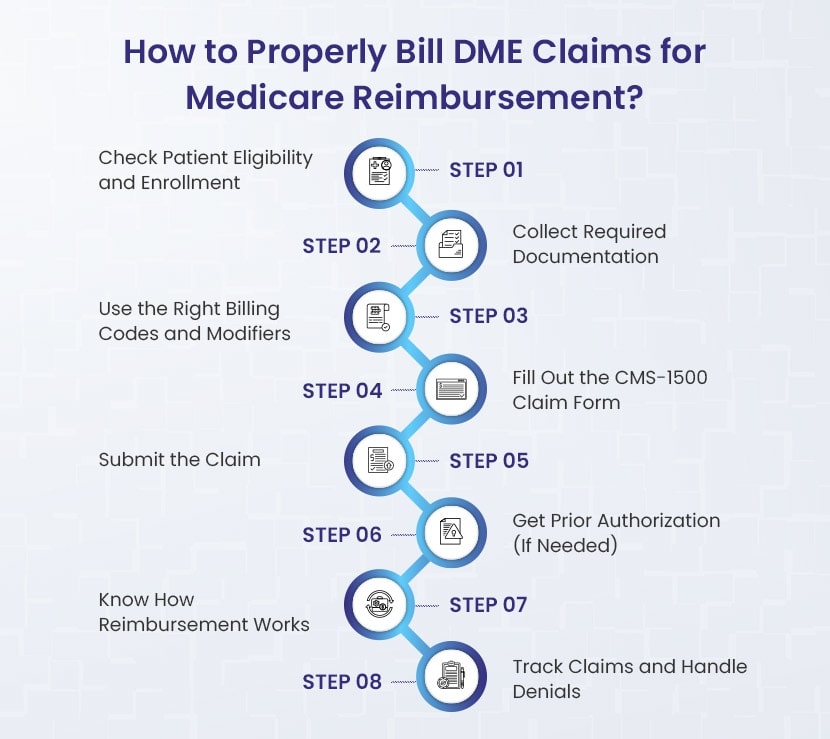
How to Bill DME Claims to Medicare?
1. Check First – Verify that the patient has active Part B coverage, that the item is covered, and your enrollment as a DMEPOS supplier before billing anything.
2. Paperwork Matters – Always have a Standard Written Order, supporting medical records, and Proof of Delivery. Use an ABN if Medicare may not pay.
3. Code it Correctly – Use the correct HCPCS code with the correct modifier (NU, RR, KX, GA, GY) to reflect how the item is used / rented.
4. File Clean Claims – Complete the CMS-1500 or CMS-837P carefully! Use the correct POS code and ensure that you have the correct diagnosis pointers, modifiers, and provider’s information.
5. Submit On Time – Submit claims electronically whenever possible and track them through your MAC or supplier plans portal. Remember, Medicare has one year deadline for filing claims.
6. Know When PA Is Required – Items such as power mobility devices are subject to prior authorization or the face-to-face rule for the billing practitioner.
7. Understand Reimbursements – Medicare pays 80% after the deductible, the patient is responsible for 20% coinsurance. Many items are subject to capped rental rules with ownership transferring in some fashion after 13 months.
8. Follow Up – Keep track of any claims, read your remittance advice and if any claims are denied, have a DME billing company “fast-track” the appeal process by utilizing the standard CMS appeal forms with the applicable deadlines.
Step 1: Confirm Enrollment and Eligibility
Check three things before billing Medicare for any equipment: the patient has the right coverage, the equipment is eligible, and you, as the supplier, are correctly enrolled. Your claim will probably get rejected if any of these parts are missing.
Let’s go through the specific checks that make up Step 1:
➜ Check the patient’s insurance.
Part B covers supplies, orthotics, prosthetics, and durable medical equipment under Medicare. This part is also called DMEPOS. Check that Part B is active on the day you plan to deliver the equipment.
The easiest way is through your clearinghouse, practice management system, or the provider portal (CGS or Noridian) for your DME MAC. Check a few important details while you look.
- Does Part B apply to the date of service?
- Is Medicare the main insurance or the backup insurance?
- Does the patient have a Medicare Advantage plan (HMO/PPO) instead of a regular Medicare plan?
You will submit the claim based on each of these answers.
➜ Verify that the item is both medically necessary and covered.
Medicare pays for equipment that doctors say is necessary and meant for use at home. “Home” can mean a private house, an assisted living place, or even a nursing home, as long as it is not a skilled nursing facility under a Part A stay.
If the patient is in a hospital or a skilled nursing facility under Part A, Medicare does not pay for DME separately. The payment to the facility includes the equipment costs in these cases. Billing can happen only after the hospital releases the patient or after the Part A stay ends.
Make sure you have the appropriate documentation ready at this time:
- A Standard Written Order (SWO) comes from the treating provider. It must include all required details: the patient’s name, Medicare ID, item description and quantity, provider’s NPI, signature, and date.
- Verify the requirements right away if the item is on Medicare’s list for in-person visits or prior authorization (such as some power mobility devices).
- Plan ahead to decide if you will buy or rent the item, especially if it is usually a capped rental, like many respiratory items.
➜ Verify Your Supplier Eligibility
Even if the patient and equipment qualify, you won’t get paid unless you’re an active, enrolled DMEPOS supplier. This means:
- You have to be enrolled in Medicare.
- Typically, you have to accept assignment, which means that the patient simply has to pay their deductible and coinsurance and Medicare will pay the entire amount authorized.
- Your Medicare PTAN must connect to your NPI and the right practice location.
If you are new or making changes, you must fill out the CMS-855S form. DMEPOS suppliers must meet requirements. They need accreditation and a $50,000 surety bond for each NPI or location.
Step 2: Compile the Required Records
Medicare DMEPOS billing requires correct documentation. Before making a claim, ensure that all of your paperwork is accurate and comprehensive. Missing or inaccurate paperwork results in rejections.
Here are the things you need to ensure in step 2:
➜ SWO, or Standard Written Order
SWO stands for Standard Written Order. Medicare no longer uses the previous “Detailed Written Order” (DWO). Each piece of equipment now needs a Standard Written Order (SWO). It is basically a record that shows the provider actually ordered the item.
The SWO should contain:
- The Medicare Beneficiary Identifier (MBI) or the patient’s name
- Order date
- A brief description of the product, including model, brand name, and HCPCS code
- Quantity (as required or if applicable)
- The treating physician’s name or NPI
- The practitioner’s signature and date
💡 Advice: For some items, such as electric mobility equipment, get the SWO prior to delivery. This is called a Written Order Prior to Delivery (WOPD).
Important Update: Removal of CMNs and DIFs
Beginning January 1, 2023, Medicare no longer requires Certificates of Medical Necessity (CMNs) or DME Information Forms (DIFs). Those forms are no longer needed.
Instead, you must support your claim with:
- A valid SWO, and
- The patient’s medical record documenting the item’s medical necessity and adherence to all Local Coverage Determination (LCD) or National Coverage Determination (NCD) policy standards.
➜ Proof of Delivery (POD)
After delivery of the item, preserve a copy of the Proof of Delivery (POD) to show Medicare that the patient received the device. Your POD should contain:
- Patient’s name and address
- Product description (brand, model, narrative, HCPCS code)
- Quantity delivered
- Date of delivery
- Evidence of delivery (e.g., patient signature for in-person delivery or a complete tracking record for shipped items)
📌 Note: Suppliers must retain POD and other records for seven years after the service date.
➜ Notice of Advanced Beneficiary Noncoverage (ABN)
If you believe Medicare will not cover the item, file an Advance Beneficiary Notice of Noncoverage (ABN) before delivery. This may happen if the item does not comply with policy standards.
The ABN (Form CMS-R-131) informs the patient that they may be responsible for payment if Medicare denies the claim.
This prevents unexpected charges for both you and the patient and allows you to use the appropriate claim modifiers (GA, GZ, and GY).
| Document | Why it matters | What must be included | When to use it |
|---|---|---|---|
| Standard Written Order (SWO) | Proves the doctor ordered the equipment | Patient name/MBI, order date, clear description (HCPCS/brand/model), quantity, practitioner name or NPI, signature/date | Always required; for some items must be before delivery (WOPD) |
| Medical Records | Show medical necessity and policy compliance | Doctor’s notes, test results, diagnoses, prior treatment history | Always required (kept on file, not submitted with every claim) |
| Proof of Delivery (POD) | Confirms the patient actually received the item | Patient name, address, item details, quantity, delivery date, and delivery evidence (signature or shipping proof) | After delivery; keep for 7 years |
| Advance Beneficiary Notice (ABN) | Protects both patient and supplier when coverage is uncertain | Completed and signed ABN form given before delivery | Only when Medicare may deny; FFS Medicare only (not MA plans) |
Step 3: Be Sure to Use Proper Billing Codes and Modifiers
When you bill Medicare for DMEPOS, the HCPCS Level II code tells Medicare exactly what item you are providing (i.e., walker, hospital bed, oxygen). But the submission of a DME billing claim also takes a code AND a modifier to show how the item is being used, purchased, or rented.
It’s absolutely critical that you use the proper code/modifier combination. Otherwise your claim could be denied or paid incorrectly.
Here are some common modifiers used in DME billing:
NU – New Equipment
Use this modifier when you want to bill for a brand new piece of equipment that the patient will own, like a walker or oxygen concentrator.
RR – Rental
This modifier marks the claim as a rental and not a purchase. Many DME billing items mark for rental monthly under capped rental guidelines (e.g. hospital beds, oxygen equipment).
KX – Policy Requirement Met
This shows that you have met all the coverage requirements listed in the Local Coverage Determination (LCD). For example, oxygen equipment claims usually require KX to show that qualifying test results and documentation are on file.
GA – ABN On File
This indicates to Medicare that you have issued an Advance Beneficiary Notice (ABN) and the patient signed it prior to delivery. If Medicare denies, the patient is fully responsible.
GY – Not a Medicare Benefit
Used when an item is explicitly not covered by Medicare at all (i.e., convenience items). The claim will auto deny, but the modifier denotes the denial correctly so you can bill for the charge with the patient.
Modifiers help Medicare understand exactly what is going on with the claim. In essence:
- If you bill in the current claim for the rented hospital bed, the HCPCS code identifies the kind of bed, but adding RR shows Medicare it is a rented bed (so they will expect to see more claims in a repeating manner).
- If the patient signed the ABN because the coverage was unknown, adding GA lets Medicare know you followed the proper process.
- If policy requirements (like qualifying test results) are met, KX signals that the documentation supports coverage.
Using the modifiers appropriately not only ensures you will be paid faster and more accurately, it also protects you in audits.
Step 4: Complete the CMS-1500 Claim Form
Medicare requires suppliers to use the CMS-1500 claim form, or the electronic version called the 837P. Most suppliers file electronically, but the paper form is still the standard layout. No matter how you send it, accuracy is critical. To avoid claim rejection, it is important to avoid errors, even minor errors.
The most important fields in this form are:
Item 1 and 1a: Select Medicare as the payer and enter the patient’s Medicare Beneficiary Identifier.
Item 17 and 17b: Enter the name of the ordering physician and their NPI. You will need to use the “DK” qualifier to indicate this is the ordering provider.
Item 21: List all the ICD-10 diagnosis codes that support medical necessity. Every diagnosis code has a letter associated with it; A through L.
Item 24A: Date of service. If this is a purchased item, use the date of delivery. If this was a rental item, show the start and end of the billing period, usually one month.
Item 24B: Enter the Place of Service (POS) code. Most DME will be 12, meaning home.
Item 24D: Enter the HCPCS code, to be clear the HCPCS code must include all modifiers. For example rental = RR, medical necessity = KX.
Item 24E: Enter the diagnosis pointer code. It will connect the service line for the claim to the claim diagnosis codes in Item 21.
Item 24F: Enter your total charge for the service line.
Item 24G: Enter the number of units. It is usually one unit per month on most DME rental items. However, for the rental of supplies, enter the actual quantity provided.
Item 24J: Enter the NPI of the supplier who is providing the service.
Item 23: If prior authorization was required, and approved, enter the authorization number.
Item 32 and 32a: Enter the location where the actual service was provided, and the NPI of the location. For home use, this is usually the patients’ address.
Item 33 and 33a: Enter your company’s billing information including name, address, phone, and billing NPI.
Item 27: Mark “yes” to accept assignment. Accept assignment means you agree to accept Medicare’s approved amount as payment in full and the patient is only responsible for their deductible and coinsurance.
Here are the Place of Service codes you will use most often when billing DME claims to Medicare:
- 12 Home – the most common code for DME.
- 13 Assisted Living Facility – used when the patient lives in an assisted living setting.
- 14 Group Home – used if the patient resides in a group home.
- 31 Skilled Nursing Facility – used when the patient is in a SNF but not under a Part A stay.
- 32 Nursing Facility – used for long term care or custodial care settings.
Note: You may not bill separately for DME if the patient is in the hospital or in a Skilled Nursing Facility under Part A. The facility is liable for those costs. You only bill when the patient has been discharged or the Part A stay has ended.
Example:
You are billing for a rental hospital bed delivered to a patient’s home on October 10. In Item 24A, enter the date range for one month of rental. In Item 24B, use 12 for home. In Item 24D, enter the HCPCS code for the bed with RR modifier for rental and KX modifier to denote policy requirements were met. In Item 24E, point to the diagnosis code from Box 21. In Item 24F, enter your monthly charge. In Item 24G, put one unit. Make sure items 17, 32, and 33 are filled out as well.
Step 5: Submit the claim
After going over the appropriate medical claim form, submit your claim. For Original Medicare, claims are submitted to the DME MAC. Many suppliers submit claims electronically through a billing software and clearinghouse, or through the MAC’s tools. Electronic filing is quick and will allow for confirmation of claim status faster. As a reminder, paper filing is allowed, via a CMS-1500 form, in limited circumstances.
When a patient has a Medicare Advantage plan, submit the claim with the plan, not the DME MAC. Just as with Original Medicare, electronically submit the claim using the plan’s portal in accordance with their authorization and deadlines.
You should keep your Standard Written Order, progress notes and proof of delivery on file and provide documentation on request by the payer. You should only provide records when specifically asked. If the claim required prior authorization, place the authorization or tracking number on the claim. Original Medicare requires that claims are filed no later than one year from the date of service.
In the rare instance that a supplier does not submit a claim to Medicare for a covered item, the patient can invoice a claim directly to Medicare with the claim form CMS-1490S. While extremely rare, it is good for patients to know they have that option.
Step 6: Obtain prior authorization, as needed
Some items will need permission from Medicare before you can bill the item to Medicare. CMS has a Medicare Master DMEPOS list that includes items that have payment conditions, as well as two Required Lists that may require action from you as the DME supplier. You need to determine if your item is still on the Required Prior Authorization List or on the Required Face-to-Face and Written Order Prior to Delivery List.
If prior authorization is required, you must obtain the medical record and order, submit the request to your DME MAC, and wait for a response. When the request is approved, the DME MAC will issue a Unique Tracking Number (UTN) and you must put the UTN on the claim.
- Paper CMS-1500: You will insert the UTN in Item 23.
- Electronic 837P: You will insert UTN in the 2300 claim loop or in the service line loop, 2400 using REF01 G1.
If the claim is subject to prior authorization and the UTN is not attached or is attached with a non-affirmation, Medicare will deny the claim.
Step 7: Understand how reimbursement works
Once the patient has met the Part B deductible, Medicare pays 80% of the allowable amount and the patient pays 20% as coinsurance.
Some items are purchased outright. For instance, canes or many walkers are just purchased. Others are rented. For most of the rental items for which Medicare has capped rental rules, payment is made per month, and after 13 months of an uninterrupted rental payment, the supplier must transfer ownership of the equipment to the patient (with some exceptions for oxygen, etc.).
For complete information on capped rental, purchase, and exceptions of rental ownership, please refer to Chapter 20 of the Medicare Claims Processing Manual.
Step 8: Follow up on claims and denials
you should periodically follow up on the status of your claim. It is not a “file it and forget it” process. You can use your MAC portal or clearinghouse reports to find the status of the claim. When Medicare processes the claim, you will receive a remittance advice that advises you what Medicare paid, and any other adjustments. As always, you need to follow up on the denials as quickly as possible so that you don’t miss the claim timely filing deadlines.
Medicare has a clear appellate process:
First level appeal: Redetermination
You must file a redetermination appeal within 120 days of the denial notice from Medicare. You could fill out the Form CMS-20027 or you could send a written request that includes the denial, your reasons, and documentation such as the order, medical notes, and proof of delivery. This level of appeal will be reviewed by the same contractor, but a different reviewer.
Second level appeal: Reconsideration
If the redetermination appeal is denied, a reconsideration appeal is available and you can file within 180 days. You could fill out the Form CMS-20033 or send a written request that includes the above information. The appeal for this level is reviewed by a Qualified Independent Contractor.
Medicare DME Billing Mistakes You Don’t Want to Make
Billing Medicare for durable medical equipment is not simply signing and returning the forms, (here, everything matters). One slight mistake can delay a payment or have the claim denied altogether. I have witnessed these mistakes repeatedly, and I want to share them to potentially save you some headaches.
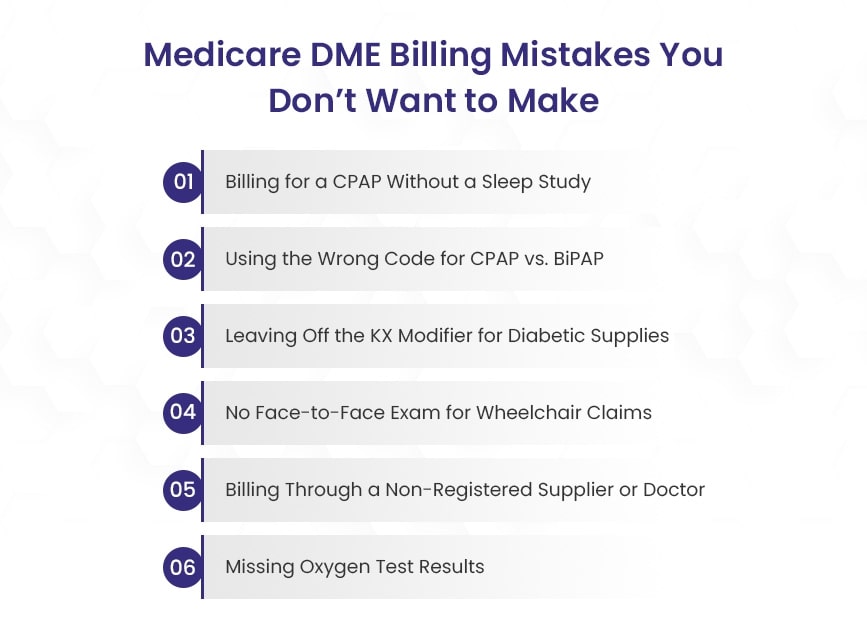
1). Billing a CPAP claim without a qualifying sleep study.
The first and definitely one of the most usual problems is the CPAP claims. You may have received the order to dispense the CPAP, and assumed you were finished. Wrong. It is not until the patient has a qualifying sleep study that Medicare will pay. The sleep study must specifically document that the patient meets the coverage criteria for obstructive sleep apnea. No qualifying sleep study, no payment.
2). Confusing CPAP vs. BiPAP codes when billing.
Another very common billing problem is confusing CPAP with BiPAP billing. The CPAP code E0601 will always be E0601 regardless of how that specific CPAP is billed. BiPAP is a whole different ball game because it is billed with E0470, or E0471, depending on which BiPAP. The issue is that Medicare will deny a claim if it does not meet the medically relevant and correlated medical records, thus ultimately denying payment.
3). Not putting the modifier on diabetes supplies.
Diabetes supplies have their own set of issues. Test strips, lancets, and continuous glucose monitors all have modifiers. For example KX is used for insulin treated patients, KS is used for non-insulin treated. Forgetting that small detail is enough to lose payment.
4). Not obtaining the face-to-face requirement for power mobility devices.
Informed consent for power mobility devices, (power wheelchairs and scooters) means that patients need to have a face-to-face appointment with their medical doctor. After the appointment, the doctor needs to document how a wheelchair is medically justified vs. a cane or walker. If the visit is only documented and not recorded properly then Medicare will never cover the expense.
5). Using orders from out of PECOS providers.
Even if you have perfectly executed paperwork, the claim will be denied if the ordering MD, or supplier is not PECOS enrolled. Medicare matches every claim to their PECOS enrollment system. If the ordering provider is not active there, the claim will not go through. A quick PECOS search before you file could save you a lot of headache.
6). Missing oxygen test results.
Lastly, oxygen equipment seemingly always confuses people. Medicare requires that you have test results, either blood gas or pulse oximetry, indicating the patient has low oxygen levels. If the results are not in the documentation or do not meet coverage, it will not be paid.
Defend every dollar from claim to appeal.
At BellMedEx, we do more than file forms, we create clean, audit-ready claims on the front end and defend them on the back end so DME suppliers are paid timely and never lose their right of appeal.
What you get from us:
- Clean claims filed on time, with proper codes, modifiers, and documentation
- Live tracking of responses and denial codes with corrections before they age out
- Appeals created immediately with complete records and logic for medical necessity
- Watch the denial codes disappear with transparent reports and a single, expert contact point
Hand your DME billing to a team that view each claim as money on the line. Let’s talk and establish your payments.